About this infection
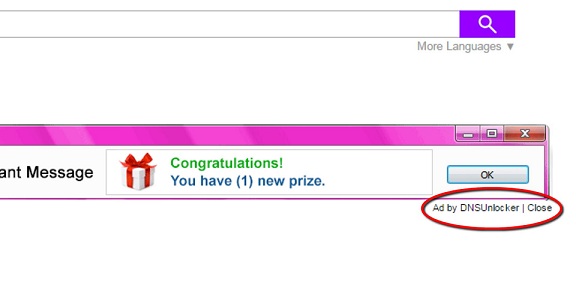
If Ads By DNS Unlocker reroutes are bothering you, advertising-supported software is possibly accountable. You allowed the adware to set up yourself, it happened when you were setting up a freeware. As adware get in quietly and may be working in the background, some users are not even aware of such a programs making home on their computers. What the advertising-supported application will do is it will create invasive pop-up commercials but since it isn’t a dangerous computer virus, it will not directly harm your operating system. It could, however, expose you to harmful sites and you can end up setting up malware onto your OS. An advertising-supported program will not be valuable to you so we encourage you delete Ads By DNS Unlocker.
Download Removal Toolto remove Ads By DNS Unlocker
How does adware affect my system
Ad-supported software will manage a silent infection, using free applications bundles to do it. These not wanted installations happen so frequently because not everyone is aware of the fact that free programs comes along with with not wanted items. Those items include advertising-supported programs, browser hijackers and other potentially unwanted programs (PUPs). You ought to avoid using Default settings when setting up something, because those settings fail to inform you about additional offers, which authorizes them to install. Which is why you need to choose Advance (Custom) settings. Those settings unlike Default, will authorize you to see and untick everything. If you want to bypass these kinds of contaminations, you need always select those setting.
Adverts will start showing up the minute the adware is inside your system. You will encounter advertisements everywhere, whether you prefer Internet Explorer, Google Chrome or Mozilla Firefox. Changing browsers will not help you dodge the adverts, you will have to eliminate Ads By DNS Unlocker if you wish to get rid of them. Advertising-supported programs make profit from showing you ads, which is why you might be encountering so many of them.Advertising-supported software sometimes present questionable downloads, and you should never agree to them.Software and updates should only be obtained from reliable sites and not weird pop-ups. The files acquired may contain severe infections so you are recommended to dodge them. Ad-supported programs could also be the reason behind your sluggish PC and crashing browser. Adware installed on your OS will only put it in danger, so uninstall Ads By DNS Unlocker.
Ads By DNS Unlocker termination
You may terminate Ads By DNS Unlocker in a couple of ways, depending on your experience with OSs. For the fastest Ads By DNS Unlocker uninstallation way, we advise getting spyware removal software. You could also erase Ads By DNS Unlocker manually but you would have to discover and eliminate it and all its related applications yourself.
Download Removal Toolto remove Ads By DNS Unlocker
Learn how to remove Ads By DNS Unlocker from your computer
- Step 1. How to delete Ads By DNS Unlocker from Windows?
- Step 2. How to remove Ads By DNS Unlocker from web browsers?
- Step 3. How to reset your web browsers?
Step 1. How to delete Ads By DNS Unlocker from Windows?
a) Remove Ads By DNS Unlocker related application from Windows XP
- Click on Start
- Select Control Panel

- Choose Add or remove programs

- Click on Ads By DNS Unlocker related software

- Click Remove
b) Uninstall Ads By DNS Unlocker related program from Windows 7 and Vista
- Open Start menu
- Click on Control Panel

- Go to Uninstall a program

- Select Ads By DNS Unlocker related application
- Click Uninstall

c) Delete Ads By DNS Unlocker related application from Windows 8
- Press Win+C to open Charm bar

- Select Settings and open Control Panel

- Choose Uninstall a program

- Select Ads By DNS Unlocker related program
- Click Uninstall

d) Remove Ads By DNS Unlocker from Mac OS X system
- Select Applications from the Go menu.

- In Application, you need to find all suspicious programs, including Ads By DNS Unlocker. Right-click on them and select Move to Trash. You can also drag them to the Trash icon on your Dock.

Step 2. How to remove Ads By DNS Unlocker from web browsers?
a) Erase Ads By DNS Unlocker from Internet Explorer
- Open your browser and press Alt+X
- Click on Manage add-ons

- Select Toolbars and Extensions
- Delete unwanted extensions

- Go to Search Providers
- Erase Ads By DNS Unlocker and choose a new engine

- Press Alt+x once again and click on Internet Options

- Change your home page on the General tab

- Click OK to save made changes
b) Eliminate Ads By DNS Unlocker from Mozilla Firefox
- Open Mozilla and click on the menu
- Select Add-ons and move to Extensions

- Choose and remove unwanted extensions

- Click on the menu again and select Options

- On the General tab replace your home page

- Go to Search tab and eliminate Ads By DNS Unlocker

- Select your new default search provider
c) Delete Ads By DNS Unlocker from Google Chrome
- Launch Google Chrome and open the menu
- Choose More Tools and go to Extensions

- Terminate unwanted browser extensions

- Move to Settings (under Extensions)

- Click Set page in the On startup section

- Replace your home page
- Go to Search section and click Manage search engines

- Terminate Ads By DNS Unlocker and choose a new provider
d) Remove Ads By DNS Unlocker from Edge
- Launch Microsoft Edge and select More (the three dots at the top right corner of the screen).

- Settings → Choose what to clear (located under the Clear browsing data option)

- Select everything you want to get rid of and press Clear.

- Right-click on the Start button and select Task Manager.

- Find Microsoft Edge in the Processes tab.
- Right-click on it and select Go to details.

- Look for all Microsoft Edge related entries, right-click on them and select End Task.

Step 3. How to reset your web browsers?
a) Reset Internet Explorer
- Open your browser and click on the Gear icon
- Select Internet Options

- Move to Advanced tab and click Reset

- Enable Delete personal settings
- Click Reset

- Restart Internet Explorer
b) Reset Mozilla Firefox
- Launch Mozilla and open the menu
- Click on Help (the question mark)

- Choose Troubleshooting Information

- Click on the Refresh Firefox button

- Select Refresh Firefox
c) Reset Google Chrome
- Open Chrome and click on the menu

- Choose Settings and click Show advanced settings

- Click on Reset settings

- Select Reset
d) Reset Safari
- Launch Safari browser
- Click on Safari settings (top-right corner)
- Select Reset Safari...

- A dialog with pre-selected items will pop-up
- Make sure that all items you need to delete are selected

- Click on Reset
- Safari will restart automatically
* SpyHunter scanner, published on this site, is intended to be used only as a detection tool. More info on SpyHunter. To use the removal functionality, you will need to purchase the full version of SpyHunter. If you wish to uninstall SpyHunter, click here.